Anatomy of Hexagonal Architecture - Part 1
So here’s how I discovered hexagonal architecture…
A few days ago, my senior manager was discussing the code structure of a repository, and that’s where he mentioned it. I was immediately impressed by the name “Hexagonal Architecture” and instantly became a fan of it. Later, I wanted to learn more about it, so I started researching online. There are many articles and videos available, but they were quite confusing to me at first, so I stopped searching.
A few days later, I was reading about clean architecture and then explored how we can transition from clean to hexagonal architecture. That’s when I gained a better understanding of it.
So, enough about the past, let’s focus on the present.
What This Series Will Cover
This will be a multi-part blog series where I’ll be designing and coding a Todoist application using hexagonal architecture. Through this practical approach, we will understand how to create a system that:
- Follows reusability and dependency injection principles
- Remains framework-agnostic
- Makes testing much easier and more effective
- Significantly improves developer experience (DX)
Let me also mention that initially, this architecture might seem confusing and complex (which it is), and it’s not suitable for smaller projects. However, as you gain more hands-on experience with it, it becomes clearer and simpler to work with.
Understanding the Foundations
Hexagonal architecture was proposed by Alistair Cockburn to efficiently manage applications. It is also known as the Ports and Adapters Pattern.
The core principle is to isolate the business logic from external concerns by creating clear boundaries through ports and adapters. This allows the application core to remain independent of frameworks, databases, UI, and other external systems.
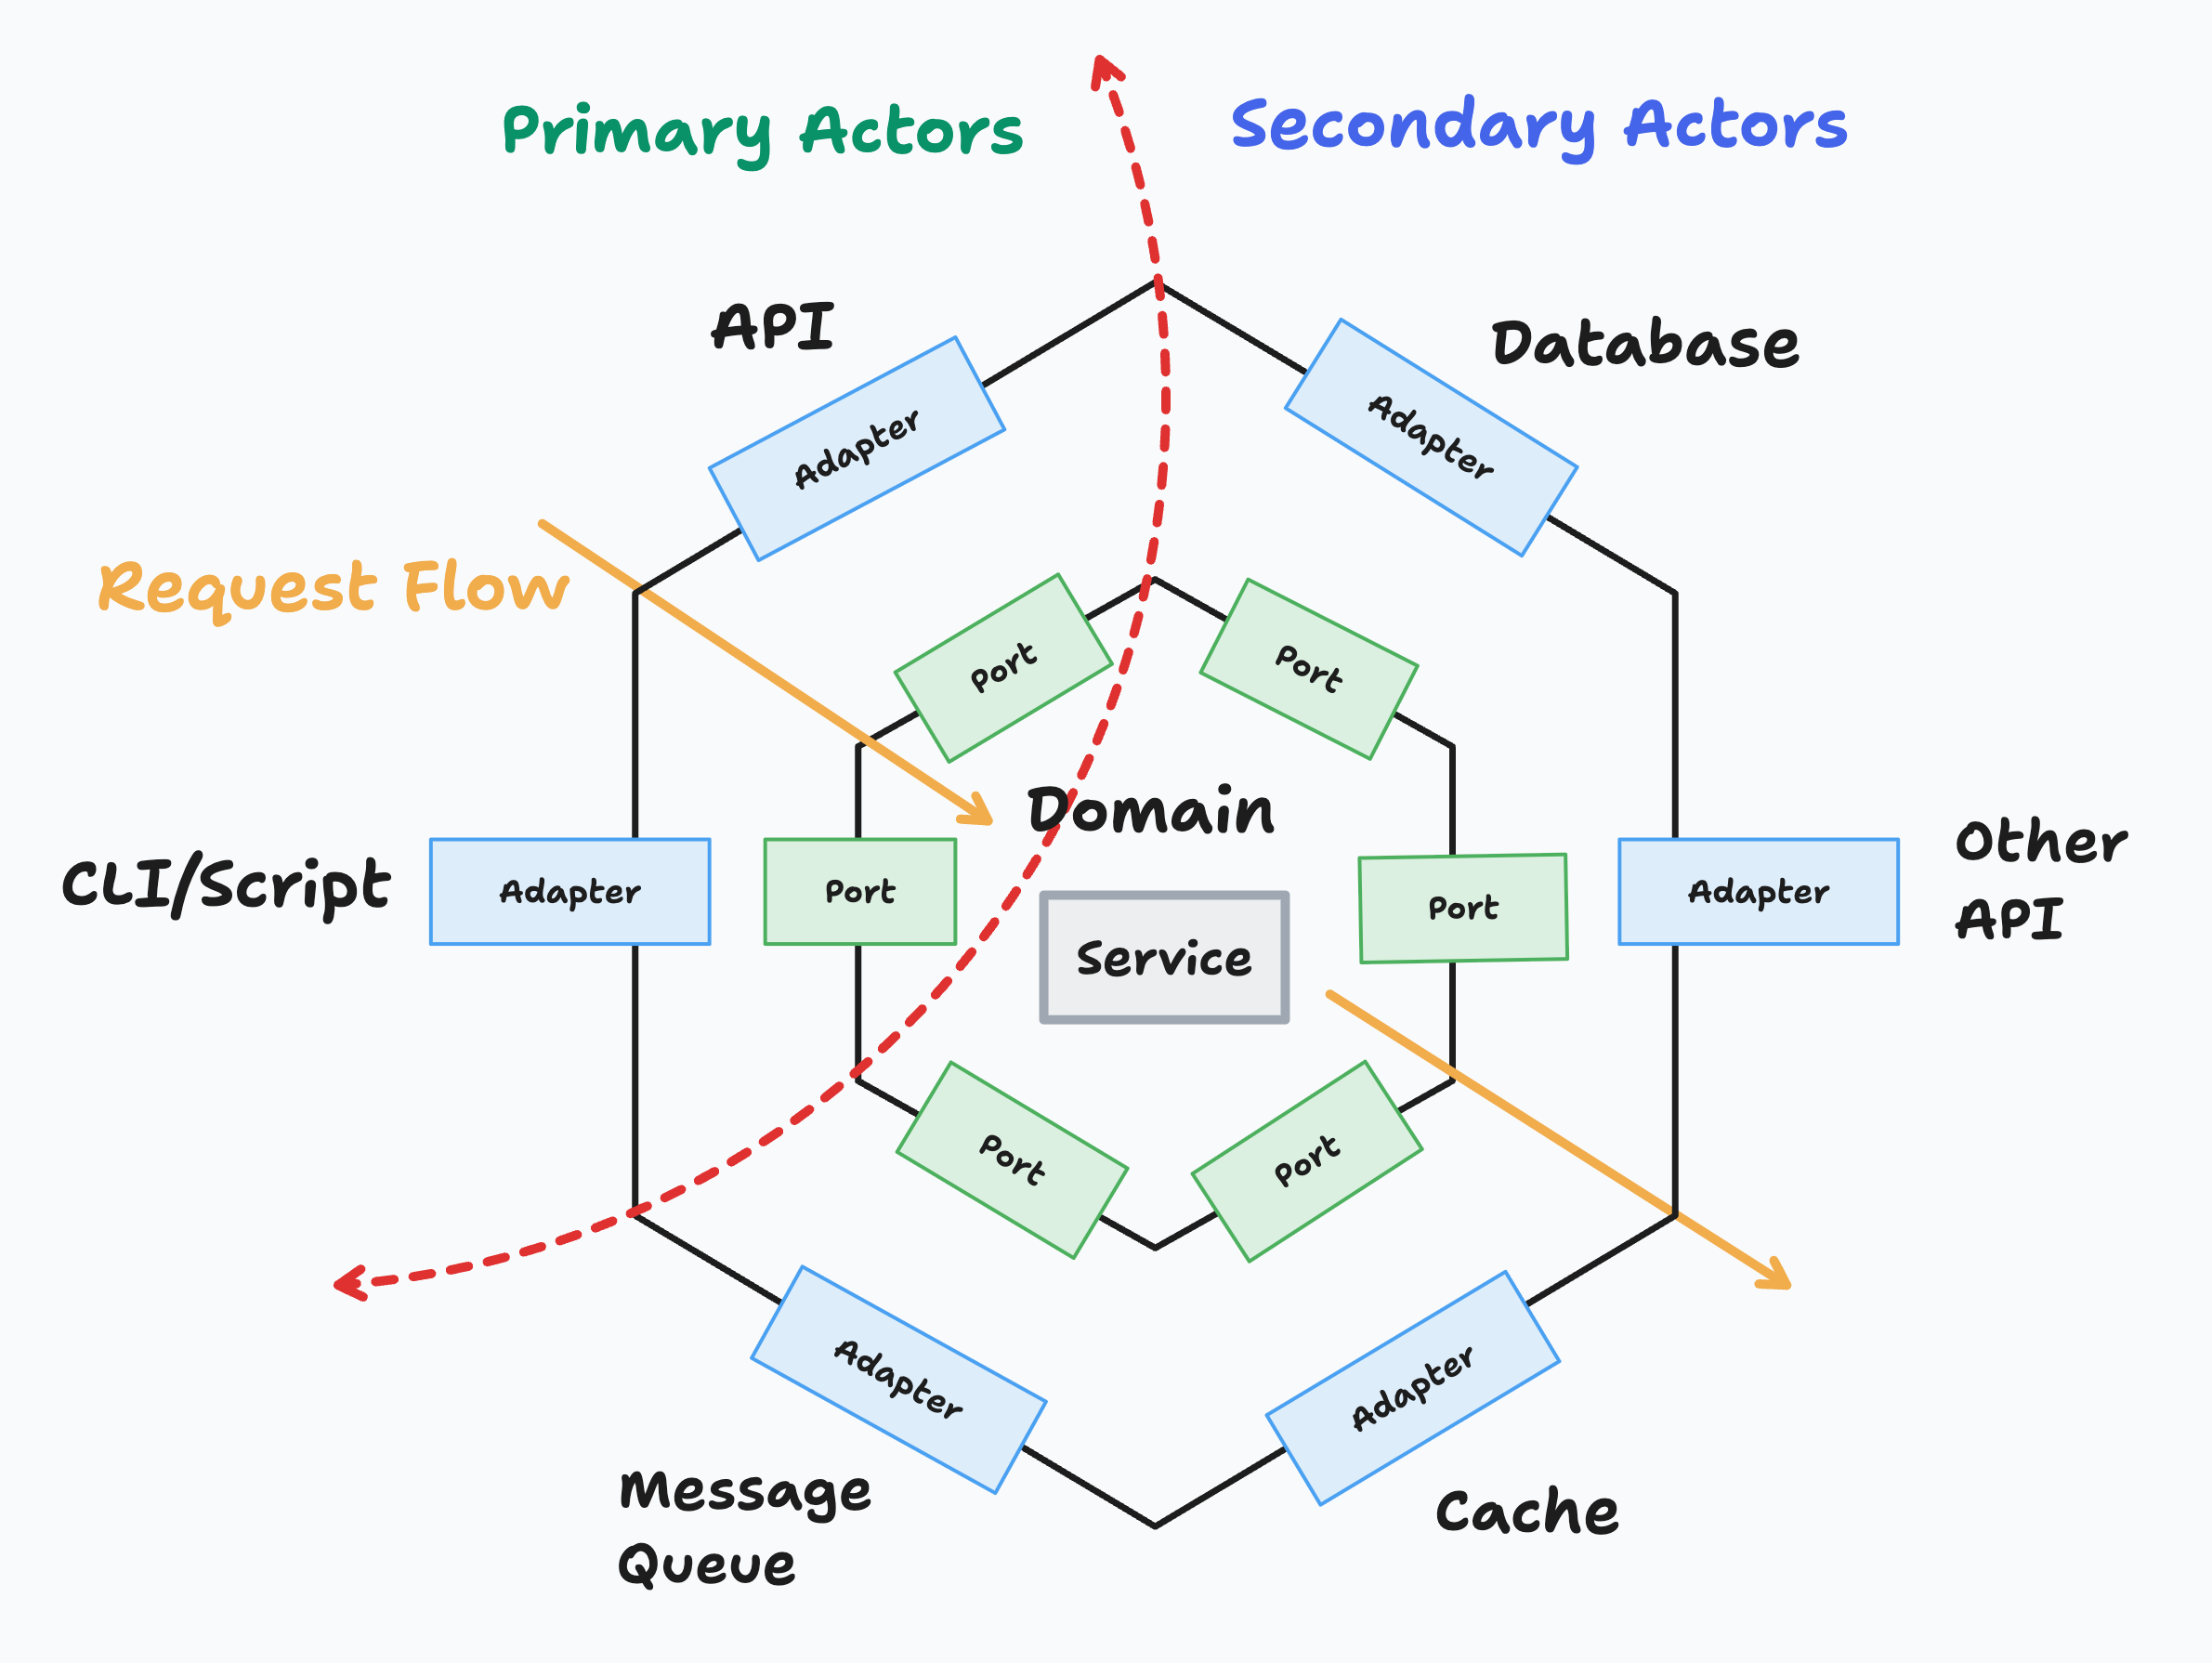
As you can see in the above diagram, this is the main design. Looks complex, right? Bear with me, you’ll understand it step by step.
The Two Sides of the Hexagon
The red dotted line in the diagram divides the architecture into two main components:
1. Primary (Driving) Side
Primary Actors are actors that drive our code/application or serve as the entry point of our system. They initiate interactions.
Examples:
- Web controllers (REST APIs)
- CLI commands
- Message queue consumers
- Scheduled jobs
- External APIs calling our system
2. Secondary (Driven) Side
Secondary Actors are actors that are driven by our application or serve as the exit point of our system. Our application calls them.
Examples:
- Databases (PostgreSQL, MongoDB)
- External APIs we call
- Cache systems (Redis)
- Message queues we publish to
- File systems
- Email services
Core Components Explained
Adapters
Adapters translate between the external world and our application core:
- Primary Adapters act like Controllers/Handlers. They receive external requests and translate them into calls to our application core.
- Secondary Adapters are typically Repositories or Gateways. They implement the interfaces defined by our application and handle communication with external systems.
Ports
Ports are interfaces that define contracts:
- Primary Ports define what our application can do (use cases). They are implemented by our services.
- Secondary Ports define what our application needs from the outside world. They are implemented by secondary adapters.
Service
This is where the business logic and use cases reside. It orchestrates the domain logic and coordinates with external systems through ports.
Domain
These are the core entities and business rules of our application. They contain the essential business logic and are completely independent of external concerns.
A Practical Example: User Profile Flow
Let’s walk through a concrete example to solidify our understanding. Imagine a frontend application that needs to display user details on a profile page.
Request Flow (Inbound)
1. Frontend makes HTTP GET request to /api/users/profile
2. HTTP Adapter (Primary) receives the request
3. Adapter calls UserService through UserServicePort (Primary Port)
4. UserService processes the business logic
5. UserService calls UserRepository through UserRepositoryPort (Secondary Port)
6. UserRepository (Secondary Adapter) queries the database
Response Flow (Outbound)
6. Database returns user data to UserRepository
5. UserRepository returns domain object to UserService
4. UserService applies any business rules and returns result
3. UserService returns data through UserServicePort
2. HTTP Adapter formats response (JSON)
1. Frontend receives HTTP response with user data
Key Benefits of This Approach
- Testability: Easy to mock ports for isolated unit testing
- Flexibility: Can swap implementations without changing core logic
- Independence: Business logic is completely framework-agnostic
- Maintainability: Clear separation of concerns and dependencies
- Scalability: Easy to add new adapters for different interfaces
What’s Coming Next
In the next part of this series, we’ll dive into the actual implementation using TypeScript/JavaScript. We’ll build a Todoist clone step by step, showing how each component fits together in practice.
Stay tuned for hands-on coding where theory meets reality!
References
For deeper understanding, I highly recommend these resources: